MAX Dynamic Adapter
Step 1. Add AscendX MAX Custom Adapter to Your Project
- Unity
- Android
- iOS
Option 1: Install AscendX MAX Custom Adapter via Unity Package Manager (UPM) - Recommended
- For first installation, add scoped registry and dependency to your
Packages/manifest.json:
{
  "scopedRegistries": [
    {
      "name": "AscendX Unity",
      "url": "https://asia-southeast1-npm.pkg.dev/ascendx-463208/asx-upm-prod",
      "scopes": [
        "com.ascendxnow"
      ]
    }
  ],
  "dependencies": {
    "com.ascendxnow.applovin-mediation-adapter": "1.4.0"
  }
}
- To update to the latest version, open Window → Package Manager and click the “Refresh” button. Find
AscendX Custom Adapter for AppLovin MAXin the list, and click Update if an update is available.
Option 2: Manual Installation
Add AscendXDependencies.xml to Your Project.
E.g. <root project>/Assets/Editor/AscendXDependencies.xml
<?xml version="1.0" encoding="utf-8"?>
<dependencies>
    <androidPackages>
        <androidPackage spec='com.knorex:ascendx-mobile-sdk-max-custom-adapter:1.13.0'>
            <repositories>
                <repository>https://asia-southeast1-maven.pkg.dev/knorex-rtb/ascendx-sdk</repository>
            </repositories>
        </androidPackage>
    </androidPackages>
    <iosPods>
        <iosPod name="AscendXMAXAdapter" version="~> 1.10.0" source="'https://bitbucket.org/knorexteam/cocoapods-specs.git'" />
        <iosPod name="AscendXSDK" version="~> 2.16.0" source="'https://bitbucket.org/knorexteam/cocoapods-specs.git'" addToAllTargets="true" />
    </iosPods>
</dependencies>
repositories {
    maven { url "https://asia-southeast1-maven.pkg.dev/knorex-rtb/ascendx-sdk" }
}
dependencies {
    implementation 'com.knorex:ascendx-mobile-sdk-max-custom-adapter:1.13.0'
}
target 'My-App' do
    pod 'AscendXMAXAdapter', '~> 1.10.0' , :source => 'https://bitbucket.org/knorexteam/cocoapods-specs.git'
end
Step 2. Add AscendX to Your MAX Mediation Waterfall
2.1 Add AscendX as a Custom Network in Your MAX Dashboard
-
Open your app dashboard in Applovin MAX.
-
In the MAX Dashboard, go to MAX → Mediation → Manage → Networks.
-
Click on “Click here to add a Custom Network” at the bottom of the page.
-
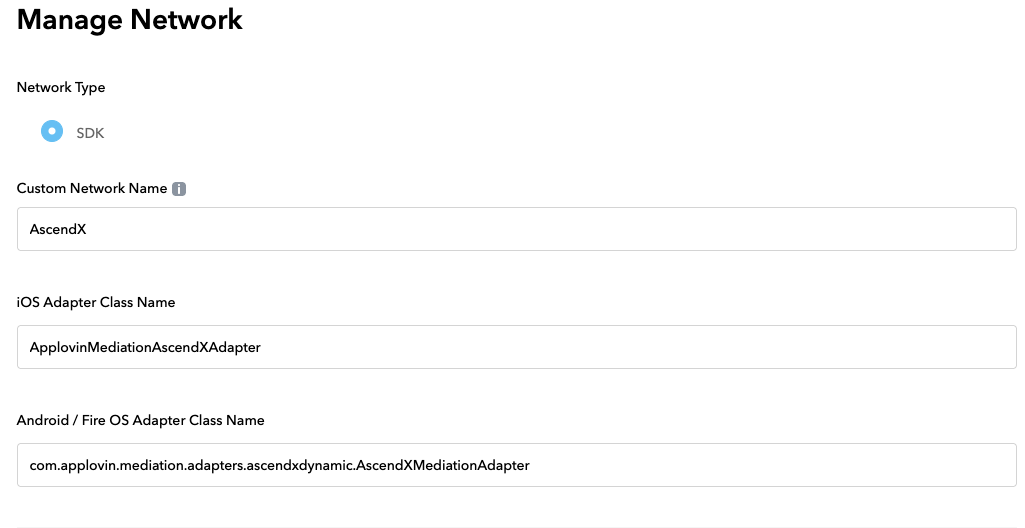
In the Manage Network page, add the following information and click Save:
Custom Network Name: AscendX
iOS Adapter Class Name: ApplovinMediationAscendXAdapter
Android / Fire OS Adapter Class Name: com.applovin.mediation.adapters.ascendxdynamic.AscendXMediationAdapter
2.2 Add AscendX to Your Ad Unit Waterfall in MAX
-
Navigate to Your Ad Unit
-
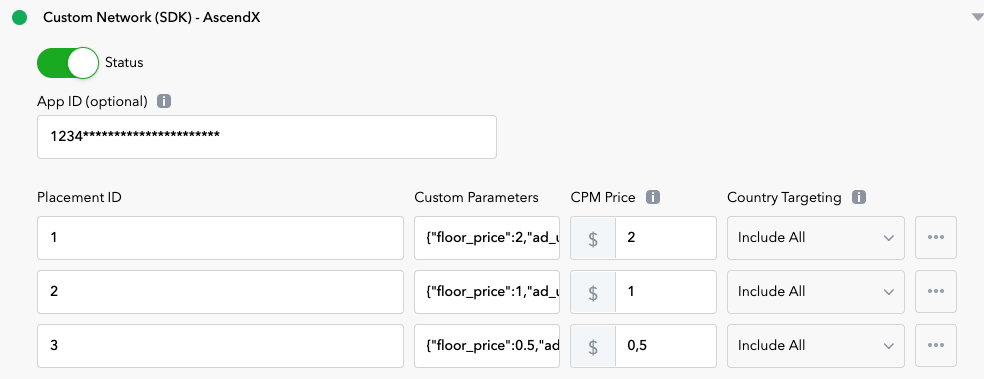
Enable AscendX in Custom Networks
-
In the Ad Unit edit screen, scroll down to Custom Networks.
-
Select AscendX from the list and switch the Status to On.
-
-
Fill in the Required Fields
App ID – (Required) AscendX provided account ID
Placement ID – (Optional) It is recommended to use a meaningful naming convention as it will show up on your reports and help you identify the placement.
Example:
GN_A_ASX_BAN_01.50-GNfor App Name,Afor Variant A,ASXfor AscendX,BANfor banner format,01.50for CPM price.While MAX requires this field, AscendX does not use it — the correct placement is identified via the Ad Unit ID in Custom Parameters.
Custom Parameters – (Required) Define eCPM floor and AscendX provided parameters by using the following key-value pairs
Key Value Type Description Example floor_price Double The minimum eCPM floor for the ad request 10.5 ad_unit_id String The unique identifier for the ad unit "2fs3aFgs5st6" fetch Boolean Whether to make a network request (optional, default is false) true By default (when
fetchis omitted or set tofalse), AscendX will not perform a network request to the AscendX server. Instead, it will check for any locally cached bid response and use it if available.Example (fetch omitted — default is false, no network call):
{"floor_price": 2.0, "ad_unit_id": "2fs3aFgs5st6"}Example (explicit fetch set to false):
{"floor_price": 10.0, "ad_unit_id": "2fs3aFgs5st6", "fetch": false}Line items with
fetch: truewill request ads from the AscendX server and render if any qualified ad is returned.{"floor_price": 100.0, "ad_unit_id": "2fs3aFgs5st6", "fetch": true}
Step 3. Verify your integration
To ensure proper integration, always start by configuring your AscendX ad units to serve test ads. This helps verify that everything is set up correctly before going live.
App ID: demo-account
| Ad Unit ID | Format | CPM Price | Custom Parameters |
|---|---|---|---|
demo-waterfall-banner-ad | Banner | 10.0 | {"floor_price":10.0,"ad_unit_id":"demo-waterfall-banner-ad","fetch":true} |
demo-waterfall-native-ad | Native | 10.0 | {"floor_price":10.0,"ad_unit_id":"demo-waterfall-native-ad","fetch":true} |
demo-waterfall-interstitial-ad | Interstitial | 50.0 | {"floor_price":50.0,"ad_unit_id":"demo-waterfall-interstitial-ad","fetch":true} |
demo-waterfall-rewarded-ad | Rewarded | 50.0 | {"floor_price":50.0,"ad_unit_id":"demo-waterfall-rewarded-ad","fetch":true} |
ASX banner test ad

ASX Interstitial/Rewarded test ads

Best Practices: Dynamic Fetching Strategy
Dynamic Fetching allows AscendX to behave like a traditional waterfall adapter while maximizing fill rates through price granularity. With this setup, you can increase your opportunities to serve AscendX bids without adding latency to your stack.
How Dynamic Fetching Works
AscendX provides two behaviors depending on the configuration of each line item:
- fetch: true
- Triggers a network request to AscendX.
- Retrieves and caches a fresh bid response.
- Acts similarly to a standard mediation adapter call.
- fetch: false or omitted
- Does not initiate a new network request.
- Uses the locally cached bid from the most recent
fetch: trueline item. - Enables instant checks with zero network overhead.
By combining these two modes, publishers can create a waterfall structure that is both efficient and flexible.
Recommended Setup Strategy
To maximize AscendX performance, we recommend creating multiple line items with different floor prices. This provides:
- Price granularity: Better alignment with AscendX’s dynamic bid values.
- Higher fill rates: More line items → more opportunities to match bids.
- No additional latency: Non-fetch items read exclusively from cache.
- Retry points: Additional
fetch: trueline items allow AscendX to request again at lower floors if no qualified bid is cached.
A common approach is
- Place a
fetch: trueitem at your highest priority floor. - Add 2–3 non-fetch line items directly below it.
- Add a second
fetch: trueitem at a mid-lower floor. - Follow with additional non-fetch floors as needed.
Example Configuration:
| Line Item | fetch | floor_price | Behavior |
|---|---|---|---|
| ASX-2.0 | true | 2.0 | Initiates a network request; fills or caches the returned bid |
| ASX-1.9 | false | 1.9 | Uses cached bid if price >= 1.9 |
| ASX-1.8 | false | 1.8 | Uses cached bid if price >= 1.8 |
| ASX-1.0 | true | 1.0 | Second fetch point; requests a new bid if required |
| ASX-0.9 | false | 0.9 | Uses cached bid if price >= 0.9 |
| ASX-0.8 | false | 0.8 | Uses cached bid if price >= 0.8 |
This structure ensures efficient waterfall progression without unnecessary network calls.
Key Benefits
-
Traditional waterfall behavior:
Each
fetch: trueline item functions like a full adapter call, aligning with familiar mediation setups -
Price granularity:
Multiple floors increase the likelihood that AscendX's bid will qualify at one of your line items.
-
Zero Additional Latency:
Non-fetch floor prices (
fetchis omitted or set tofalse) rely solely on cached responses—no network calls, no waiting. -
Controlled Retry Logic:
Strategic placement of
fetch: trueat different price points provides multiple chances to fetch bids -
Flexible and Transparent:
Publishers retain full control over line item structure and behavior.